Bundling React (Vite) with Spring Boot
Learn how to bundle your frontend with a Spring Boot backend into a single JAR, simplifying both dev and ops.

spring-bootjavareactvitemavenHello! 👋
In this article, we'll look at how to bundle a React frontend with a Spring Boot backend and create a single JAR file.
An Angular or Vue or Solid or Svelte frontend would've also worked, but today we're choosing the following technologies:
Frontend:
- React
- Vite (frontend build tool, pronounce: Veet)
Backend:
- Spring Boot
- Maven (backend build tool)
Additionally, I'll show you how to automate the build with a GitHub actions pipeline.

If you'd like to follow along, please make sure to have Java 20 and Node 20 (or newer versions) installed.
You can also find the final source code for this project on GitHub.
Table of Contents
- Starting with a Simple Backend
- Creating a Simple React App
- Serving Assets Attempt 1 - Spring's Static Folder
- Serving Assets Attempt 2 - Adding Spring Resource Handlers
- Good to Know
- CI/CD
- Conclusion
Starting with a Simple Backend
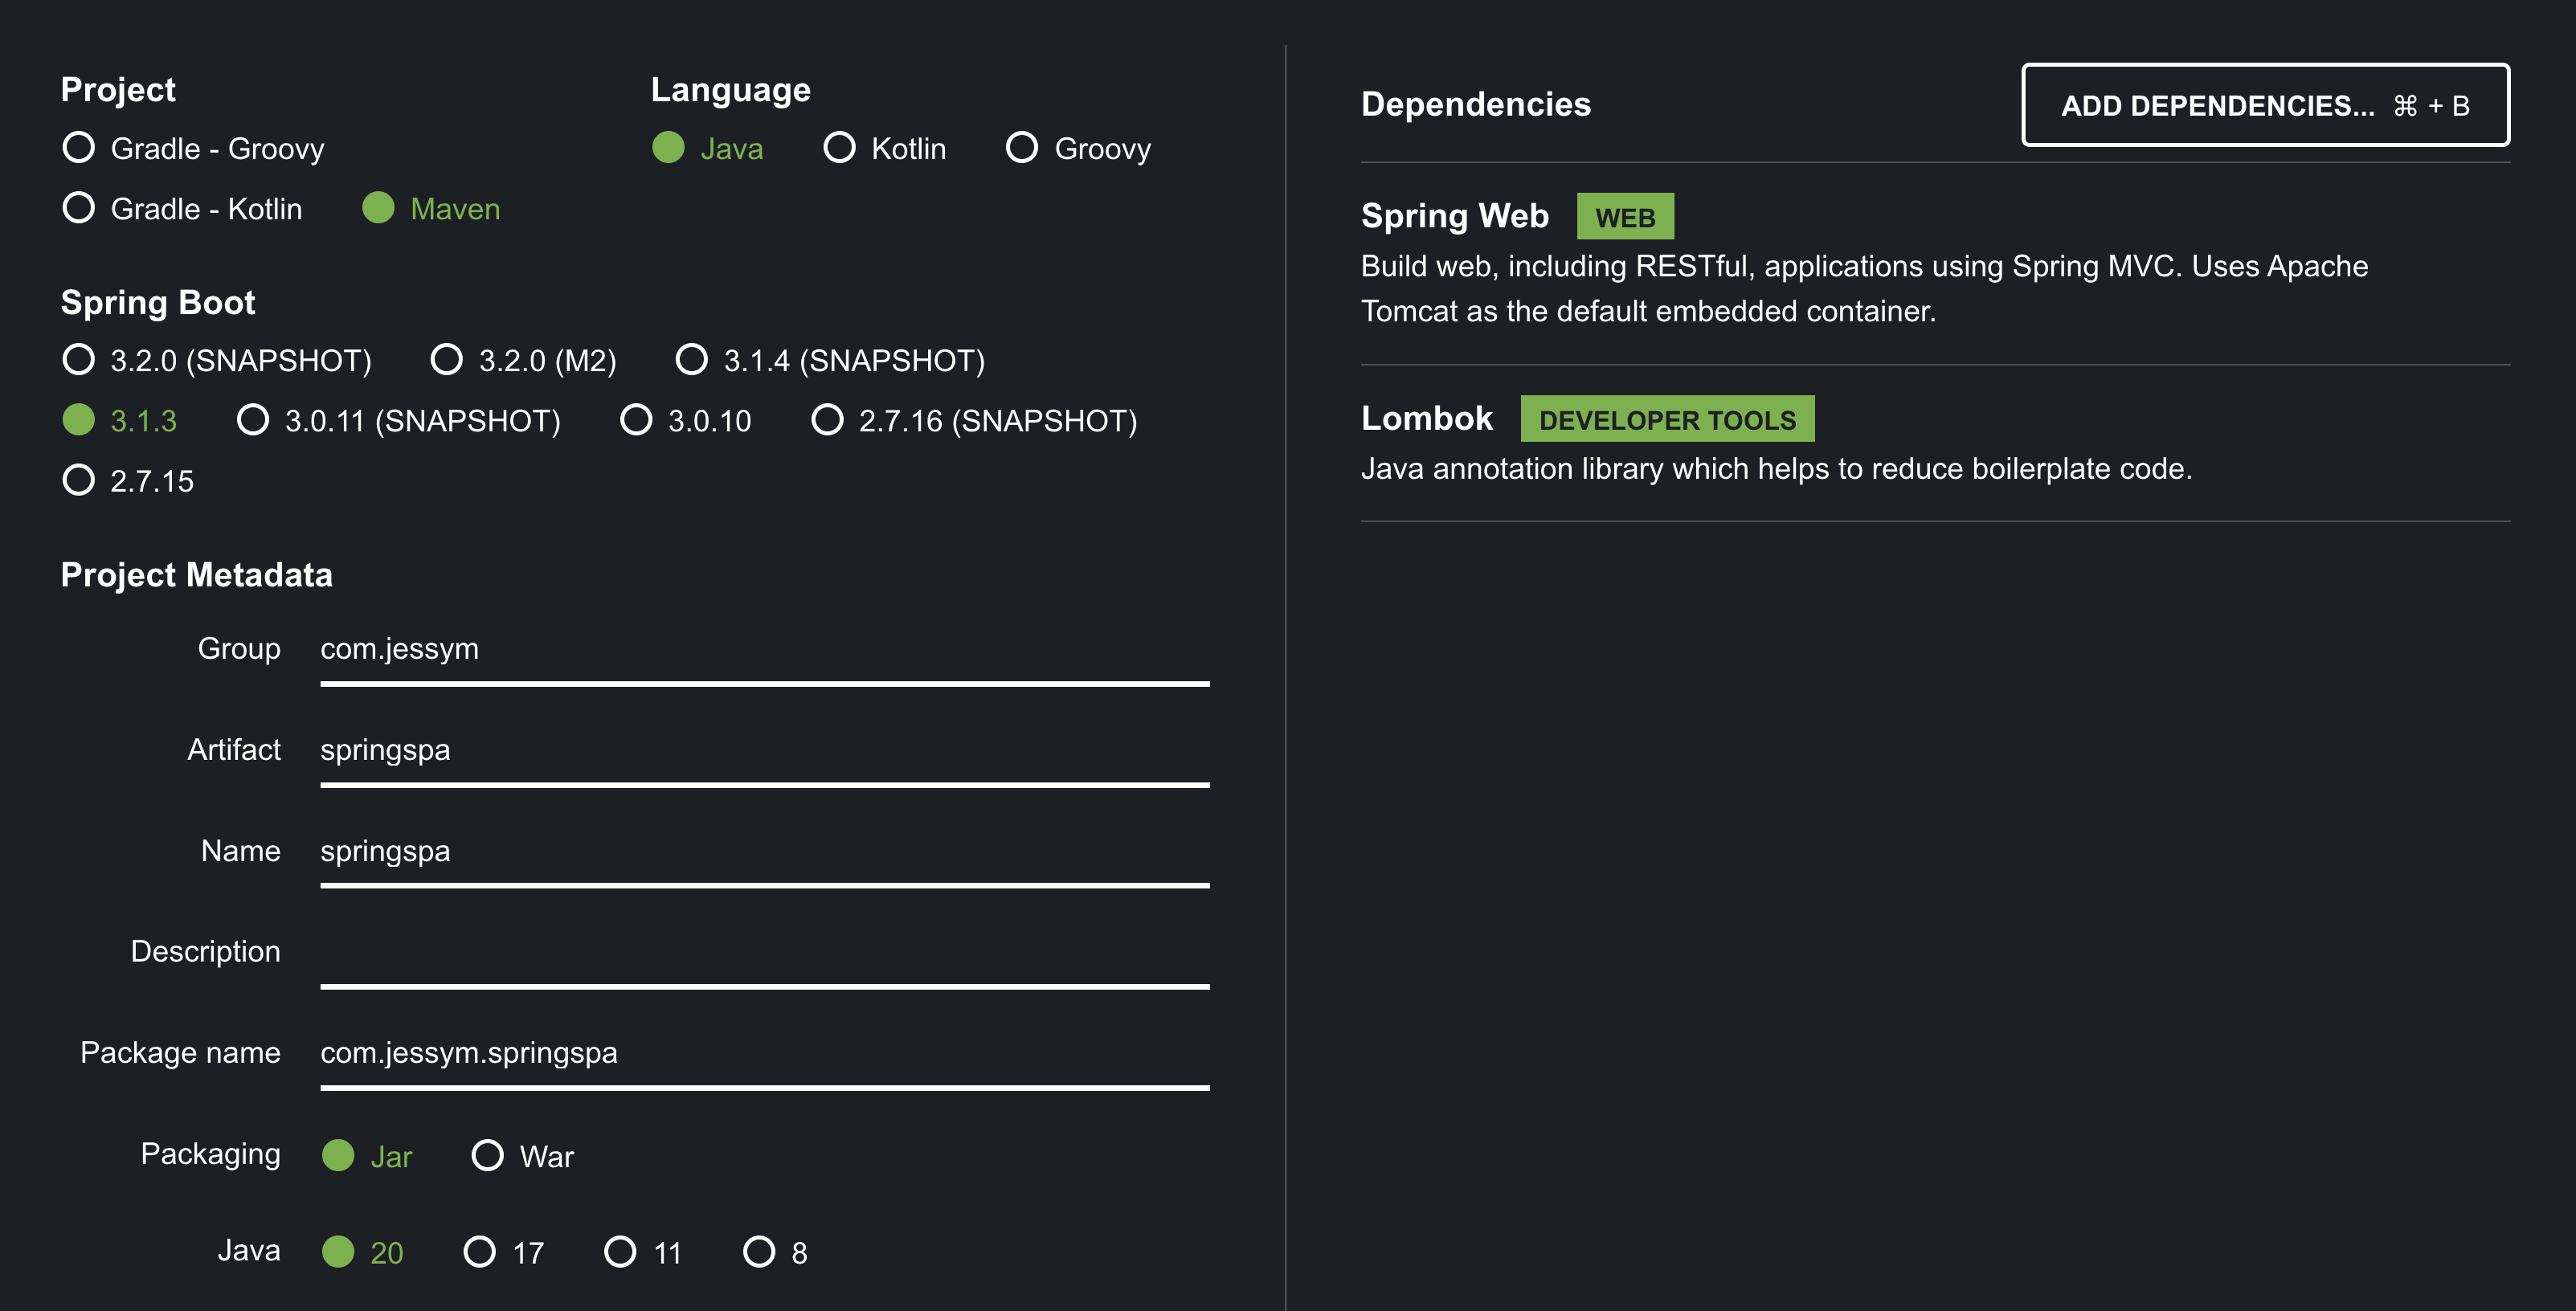
To get started, simply head over to the Spring Initializr website and generate a new project. The only hard dependency requirement is Spring Web, but I also recommend adding Lombok to reduce boilerplate and improve code cleanliness ✨.
The other settings don't matter so much—I'm personally going for a Maven / Java 20 project.
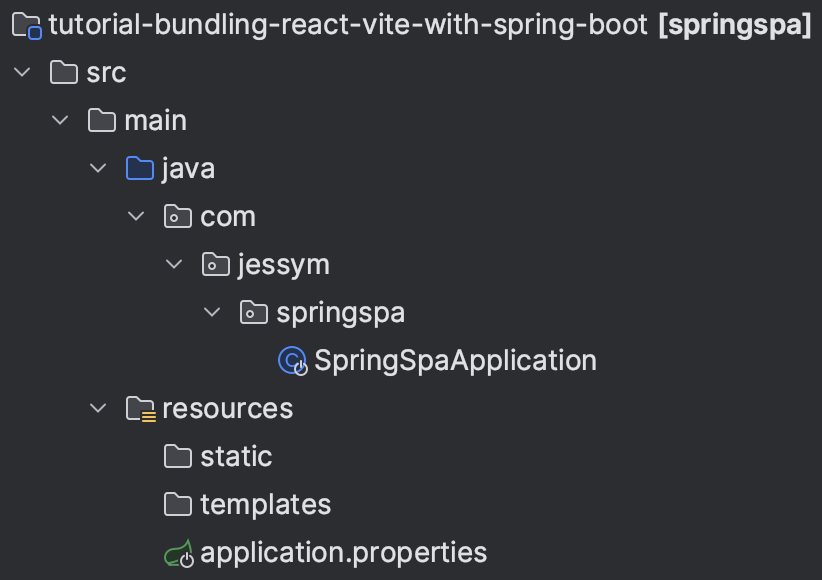
After importing the project into the IDE of your choice, you should end up with a structure similar to this.
Creating a Simple React App
Let's start by opening the command line and generating a new React App using Vite.
(Note: I would refrain from using a framework like Next.js here, because their routing is a bit special and difficult to pull off without using a Node backend to serve your Next.js frontend.)
I'll make sure to place my frontend source code in a new folder called src/main/client/,
which I'll have Vite generate for me like so:
cd src/main
npm create vite@latest client -- --template react-ts
Also, let's immediately add the popular React routing library.
cd client
npm install react-router-dom
At this point, your project should have a main.tsx file which looks something like this:
// main.tsx

ReactDOM.createRoot(document.getElementById('root')!).render(
  <React.StrictMode>
    <App />
  </React.StrictMode>
);
If you start the frontend by running npm run dev inside your terminal,
you'll be greeted with the following welcome screen.

Note, however, that if you change the URL from http://localhost:5173 to http://localhost:5173/cake for example, you'll still be greeted by the same welcome screen.
This makes sense, because in the main.tsx code snippet above, we're always rendering the <App /> component, independent of the current URL.
Adding Client-Side Routing
Let's bind this <App /> component to a specific URL instead
via our routing library:
// main.tsx

const router = createBrowserRouter([
  {
    path: '/',
    element: <App />,
  },
]);

ReactDOM.createRoot(document.getElementById('root')!).render(
  <React.StrictMode>
    <RouterProvider router={router} />
  </React.StrictMode>
);
You'll notice that http://localhost:5173 still shows the main welcome screen, but now http://localhost:5173/cake will display some kind of 404 error.

So let's actually add a page for this /cake url:
// main.tsx

const router = createBrowserRouter([
  {
    path: '/',
    element: <App />,
  },
  {
    path: '/cake',
    element: <div style={{ fontSize: 150 }}>🍰</div>,
  },
]);

ReactDOM.createRoot(document.getElementById('root')!).render(
  <React.StrictMode>
    <RouterProvider router={router} />
  </React.StrictMode>
);
Note how http://localhost:5173/cake will now display a page with a cake emoji.

For convenience, let's add a link on the main welcome page, which will take you to the cake page if you click on it.
For this, we'll open up App.tsx, where I'll first be removing a bunch of elements below the <h1>Vite + React</h1> header tag:
// App.tsx

<h1>Vite + React</h1>

{/* START REMOVE */}
<div className="card">
  <button onClick={() => setCount((count) => count + 1)}>
    count is {count}
  </button>
  <p>
    Edit <code>src/App.tsx</code> and save to test HMR
  </p>
</div>
<p className="read-the-docs">
  Click on the Vite and React logos to learn more
</p>
{/* END REMOVE */}
Next, I'll add a link to our cake page.
// App.tsx

import { Link } from 'react-router-dom';

<h1>Vite + React</h1>

<Link to='/cake'>Visit /cake</Link>
It's important to note that, instead of a regular <a> anchor tag,
I'm using the <Link /> element here,
imported from the react-router-dom library we installed earlier.
This makes sure that we'll navigate to the new page via JavaScript,
without requesting a completely new page from the backend
(which would have been the case with a regular <a> anchor tag).
Below you'll find an overview of the available URLs of our frontend:
| URL | Screen |
|---|---|
/ | Welcome page ⚛️ |
/cake | Cake page 🍰 |
/anything-else | 404 page 🤷♂️ |
The frontend is now ready.
Serving Assets Attempt 1 - Spring's Static Folder
You might be aware that Spring Boot is actually pre-configured to serve static assets from the classpath folder src/main/resources/static/.
While this default configuration works well for individual HTML files, it doesn't work so well with Single Page Applications (SPAs) with client-side routing. Like the SPA we just set up.
⚠️ If your frontend doesn't use client-side routing or 404-handling, then the rest of this article doesn't really apply—you're encouraged to stop reading, and simply use the Spring static folder 😅
I'll demonstrate why client-side routing breaks when using the default Spring Boot configuration. But before doing so, we'll have to actually build our frontend assets, so Spring has some HTML, CSS and JavaScript chunks to actually serve.
Building the Frontend Assets
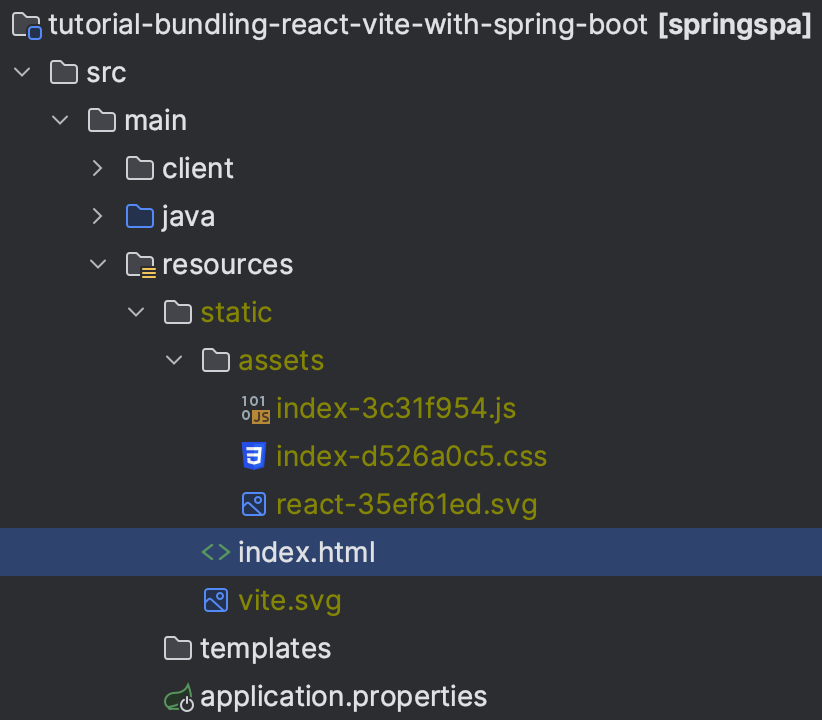
To build the frontend assets, simply run npm run build from the src/main/client/ folder.
You'll end up with a ./dist/ folder containing the static assets (HTML, CSS and JavaScript chunks) for Spring Boot to serve.
However, instead of having these files end up in the src/main/client/dist/ folder,
it's possible to send them directly to the src/main/resources/static/ folder.
For this, add the following build config to your vite.config.ts file:
// vite.config.ts

export default defineConfig({
  plugins: [react()],
  build: {
    outDir: '../resources/static/',
    emptyOutDir: true,
  },
});
After running npm run build again,
you'll find the frontend assets inside Spring's default static folder.
Also, since the contents of src/main/resources/static/
are now dynamically generated,
I recommend ignoring this folder in Git.
What Happened to Reloading Pages?
With Spring's static resource folder containing the frontend assets,
let's start our Java application from the IDE or command line.
By default, Spring should serve our frontend on http://localhost:8080

At first glance, this appears to work flawlessly:
- the main welcome page gets served
- we can even click the link to navigate to the cake page
But once you're on the /cake page, you can no longer reload the browser window:

In order to get back to the main welcome page, you'll need to manually navigate back to http://localhost:8080. And strangely enough, on this main welcome page you can reload the browser window.
So what's going on? Why can't we reload (certain) pages?
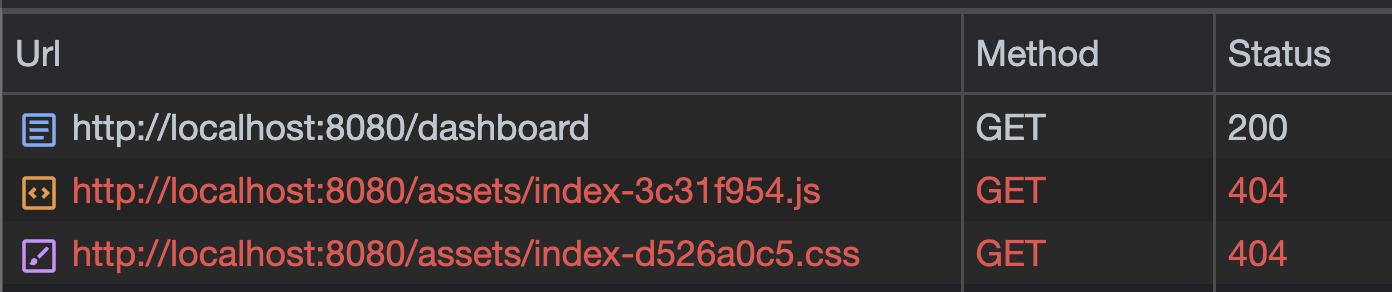
Let's take a step back and see what happens when we visit our index endpoint / (= main welcome page) for the very first time.

Spring Boot is presented with a request to serve an index file.
And because Spring Boot functions as an ordinary webserver with regards to static files,
it looks for a matching HTML file,
which it finds at the location: src/main/resources/static/index.html
So it sends this index.html file to the client.
And once received by the client browser,
this index.html file then declares some paths to JavaScript, CSS and SVG files which need to be loaded as well.
<!-- src/main/resources/static/index.html (generated) -->
<...>
  <link rel="icon" type="image/svg+xml" href="/vite.svg" />
  <script type="module" crossorigin src="/assets/index-3c31f954.js"></script>
  <link rel="stylesheet" href="/assets/index-d526a0c5.css" />
</...>
So the client browser makes requests for these .js, .css and .svg files as well.
And these requests succeed, because each of these three URL resources
/vite.svg/assets/index-3c31f954.js/assets/index-d526a0c5.css
correspond to existing files within the src/main/resources/static/ classpath folder.
Note, however, that there's no file called cake.html in the static classpath folder.
That's because the contents of that /cake page we added
are dynamically inserted by React (i.e. JavaScript) during runtime.
Put differently, whenever the URL changes from / to /cake,
there's some JavaScript and React smartness going on which detects the URL change,
and uses (low-level) browser APIs like body.removeChild(...) and body.appendChild(...) to change the entire page,
with JavaScript!

That's why we can click the Visit /cake link and it works—there's no server request to be made because the entire URL transition takes place in JavaScript land.
(And, to reiterate, this is the reason why we used that <Link> element instead of a regular <a> anchor tag earlier.)
But what happens then if we are currently on the /cake page and
click the reload button in our browser.
Let's view it in a diagram.

Spring Boot gives us an error, because it cannot find a cake.html file corresponding to the requested /cake URL resource.
This puts us in a difficult situation.
Because we've just seen that a cake.html file cannot exist
with our React / Vite frontend setup,
since each page is created dynamically by JavaScript.
- The contents of the
/cakepage are dynamically created by JavaScript - If we had a
/piepage, then the contents of this/piepage would've been dynamically created by JavaScript too - But also: the contents of our
/main welcome page are dynamically created by JavaScript as well
The last example in this list might seem strange.
Isn't the main welcome page at the index route / an exception,
since we do have a corresponding index.html file?
The answer is no 🙂.
And I can prove this by showing you the contents of the
(generated) index.html file—notice how it doesn't actually contain
any of the <img> logo's or <a> anchor tag links we clearly see
on the main welcome page:
<!-- index.html -->
<!-- (generated; but it will look something like this) -->

<!DOCTYPE html>
<html lang="en">
  <head>
    <meta charset="UTF-8" />
    <link rel="icon" type="image/svg+xml" href="/vite.svg" />
    <meta name="viewport" content="width=device-width, initial-scale=1.0" />
    <title>Vite + React + TS</title>
    <script type="module" crossorigin src="/assets/index-3c31f954.js"></script>
    <link rel="stylesheet" href="/assets/index-d526a0c5.css" />
  </head>
  <body>
    <div id="root"></div>
  </body>
</html>
So, allow me to summarize and provide a brief overview of how our frontend pages are ultimately served to a website visitor:
- By visiting
localhost:8080(orwww.example.com), aGET /request is issued to our Spring Boot backend, which will respond withindex.html - Once the client browser has received
index.html, it will load the referenced JavaScript chunk/assets/index-3c31f954.js(among other things like CSS chunks and SVG favicons) - This JavaScript chunk contains React itself, as well as our own source code
- Once the client browser has loaded and executed this JavaScript chunk, React will take over the page, meaning that:
- the correct page will be dynamically inserted at the
<div id="root">entrypoint element in theindex.htmlabove - this correct page will either be the
<App/>-element or the cake-🍰-element, depending on the current URL
- the correct page will be dynamically inserted at the
So ... all of this has been a long-winded explanation of how frontend assets are served via Spring Boot, and why it doesn't work if we click refresh on any page other than the main welcome page.
Let's find out how we can fix this refresh issue!
Serving Assets Attempt 2 - Adding Spring Resource Handlers
The solution to making the reload button work is conceptually straightforward.
We need to make sure that, whenever Spring Boot receives a URL request for a page it cannot find,
it should default to sending back index.html 🤷♂️
Why does this work?
Well, if the user reloads or visits the /cake endpoint for the first time,
and Spring Boot sends back index.html instead,
that's actually okay.
Because, once the browser client has received index.html:
- React will take over after the referenced JavaScript chunk gets loaded and executed
- React will notice that the currently active URL is
/cake - React will make sure to insert the correct page at the
<div id="root">element
There's one caveat, though: whenever the browser client requests
a URL resource for an existing file
(like /assets/index-d526a0c5.css or vite.svg),
then Spring Boot should send back that file.
So index.html is only a fallback for when the requested resource cannot be found.
Setting up the WebMvcConfigurer
The built-in interface we'll need to implement and customize is called WebMvcConfigurer,
which is part of the spring-webmvc dependency (transitively included by spring-boot-starter-web).
To this end, let's create our own SpringConfiguration class as follows:
package com.jessym.springspa;

@Configuration
public class SpringConfiguration implements WebMvcConfigurer {

    @Override
    public void addResourceHandlers(ResourceHandlerRegistry registry) {
        this.serveDirectory(registry, "/", "classpath:/static/");
    }

    private void serveDirectory(ResourceHandlerRegistry registry, String endpoint, String location) {
        // implementation will come here
    }

}
I created a private method, so it's easy to do things like this, where, in addition to the "default" frontend, you only expose certain other frontends (development dashboards, etc.) in certain environments:
if (environment.acceptsProfiles(Profiles.of("dev"))) {
    this.serveDirectory(registry, "/dev-dashboard", "classpath:/dev_assets/");
}
this.serveDirectory(registry, "/", "classpath:/static/");
But leaving that aside, let's have a look at how we might implement this serveDirectory method:
private void serveDirectory(ResourceHandlerRegistry registry, String endpoint, String location) {
    // 1
    String[] endpointPatterns = endpoint.endsWith("/")
            ? new String[]{endpoint.substring(0, endpoint.length() - 1), endpoint, endpoint + "**"}
            : new String[]{endpoint, endpoint + "/", endpoint + "/**"};
    registry
            // 2
            .addResourceHandler(endpointPatterns)
            .addResourceLocations(location.endsWith("/") ? location : location + "/")
            .resourceChain(false)
            // 3
            .addResolver(new PathResourceResolver() {
                @Override
                public Resource resolveResource(HttpServletRequest request, String requestPath, List<? extends Resource> locations, ResourceResolverChain chain) {
                    Resource resource = super.resolveResource(request, requestPath, locations, chain);
                    if (nonNull(resource)) {
                        return resource;
                    }
                    return super.resolveResource(request, "/index.html", locations, chain);
                }
            });
}
I've annotated the code above with markers 1, 2 and 3, so let's go through it step-by-step.
- We need to determine the URL patterns Spring Boot should use for serving our frontend.
- Example 1: if we want to host our frontend under the index URL
/, then that would translate to the following array of patterns:[ '', '/**' ]. - Example 2: if we wanted to host our frontend under some namespace URL like
/dashboard, then that would translate to the following array of patterns:[ '/dashboard', '/dashboard/**' ]. - For the last example, please see the upcoming section Caveats when Hosting the Frontend under a Namespace.
- Example 1: if we want to host our frontend under the index URL
- At this point, we actually register these endpoint patterns. We'll also let Spring know in which classpath folder it can find the static frontend assets via the
locationvariable. - Here's the core of our logic: we attempt to load the requested resource, but if it doesn't exist (=
null), we default to servingindex.html
Reloads are Working!
After saving these changes and restarting the Spring Boot server, you'll find that
- everything is still working as before
- but now you can also reload the
/cakeURL or go there directly without JavaScript navigation
In summary, if you'd like to host a frontend with client-side routing, you should configure your web server (in our case: Spring Boot) to handle incoming requests like this:
- if the requested URL resource actually exists as a static asset, serve it
- if not, default to serving
index.html
As a final remark: note that,
by always defaulting to the serving of index.html,
Spring Boot will never actually respond with a 404—even if the requested page /cakeblablabla doesn't exist on the frontend either.
But that's okay—we can leave it up to the frontend to show a client 404 page as a fallback for unknown URLs.
Good to Know
Below are some solutions to problems you're bound to run into if you're following this article. As well as some tips and tricks 🙂.
Dynamic Backend Base URL in the Frontend
More than likely, your frontend needs to actually communicate with your backend via some API to request data, perform actions, etc.
Let's say your backend exposes an API with endpoints like these:
- GET
/api/users - POST
/api/users - GET
/api/users/{id} - PATCH
/api/users/{id} - DELETE
/api/users/{id}
How will the frontend connect to these endpoints?
- via
http://localhost:8080/api/users? - via
https://www.example.com/api/users? - via
/api/users?
The answer is: it depends on whether you're serving the frontend and the backend separately or bundled.
If they're hosted separately, then:
- you've probably got the frontend on port 5173 via
npm run dev, and the backend on port 8080 viamvn spring-boot:runor your IDE play button - in this case, any backend request would have to be prefixed with
http://localhost:8080/api - see the image below

If they're hosted together (bundled), then:
- Spring Boot is serving the frontend assets, as well as its own API endpoints
- in this case, any backend request can just be prefixed with
/api - the beauty of this bundled situation is that Spring Boot could be hosted on any domain—the prefix will always be
/api - see the image below

Now, before we introduce this dynamic base URL in our frontend,
let's first create an ApiController so there's an actual endpoint we can call.
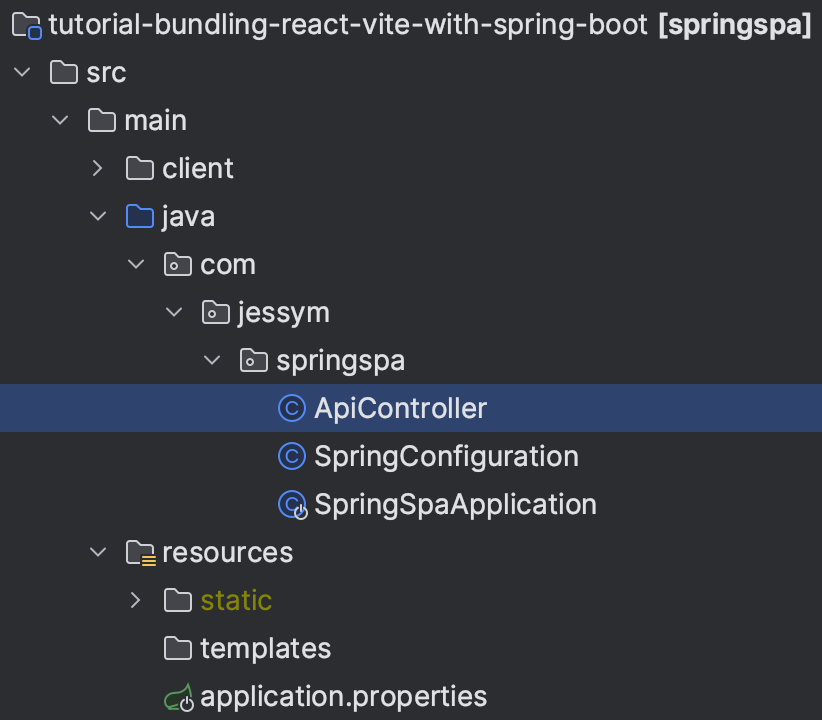
We'll just add a single endpoint to this ApiController, which can be used for checking whether the backend is reachable.
package com.jessym.springspa;

@RestController
@RequestMapping("api")
public class ApiController {

    @GetMapping("ping")
    public String ping() {
        return "pong";
    }

}
After a quick check to see if it's working (curl localhost:8080/api),
let's update our frontend homepage component App.tsx so it automatically calls this endpoint whenever it loads.
// App.tsx

function App() {
  useEffect(() => {
    fetch('http://localhost:8080/api/ping')
      .then(response => response.text())
      .then(body => console.log(body));
  }, []);
  return (
    /* ... */
  );
}

export default App;
Now, if you're running the frontend separately on port 5173 (via npm run dev),
this will likely result in a CORS error in your console logs.
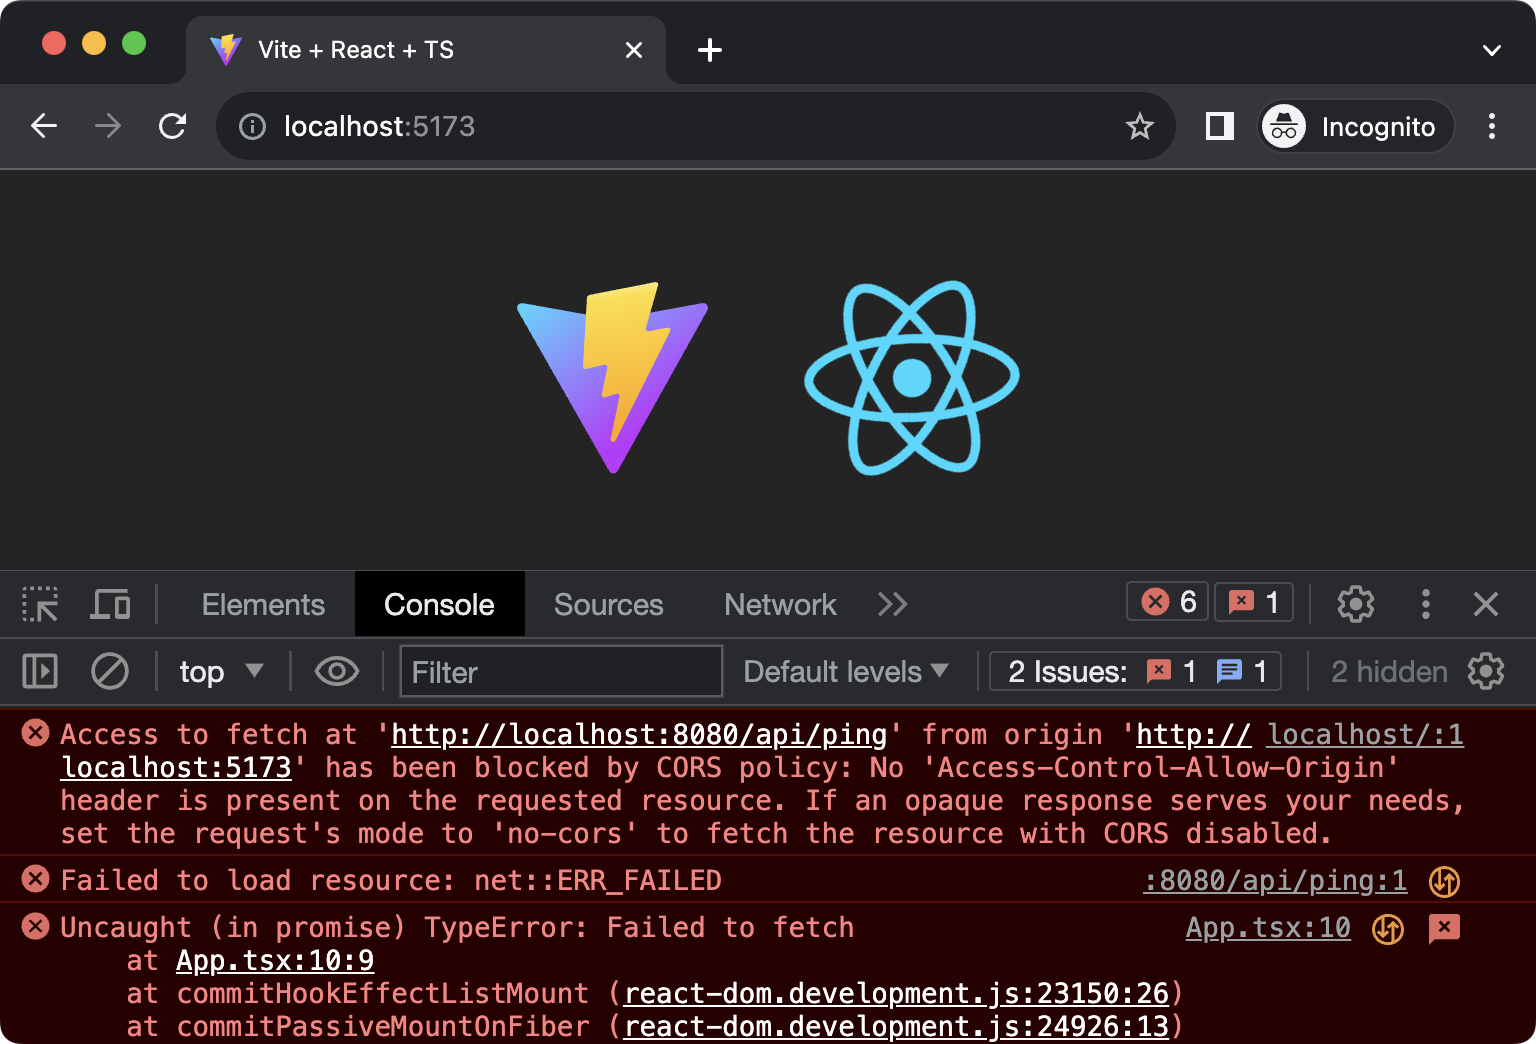
There are a few places in our backend where we can set up our CORS configuration.
Out of all those places, our existing
SpringConfiguration.java
class is the most straightforward,
since all we'd have to do is override a method called addCorsMappings from the parent WebMvcConfigurer interface.
package com.jessym.springspa;

@Configuration
public class SpringConfiguration implements WebMvcConfigurer {

    @Override
    public void addCorsMappings(CorsRegistry registry) {
        registry.addMapping("/api/**")
                .allowedOriginPatterns("*");
    }


    // ... other methods ...

}
After adding these mappings and restarting the server, you'll find the CORS problems resolved.
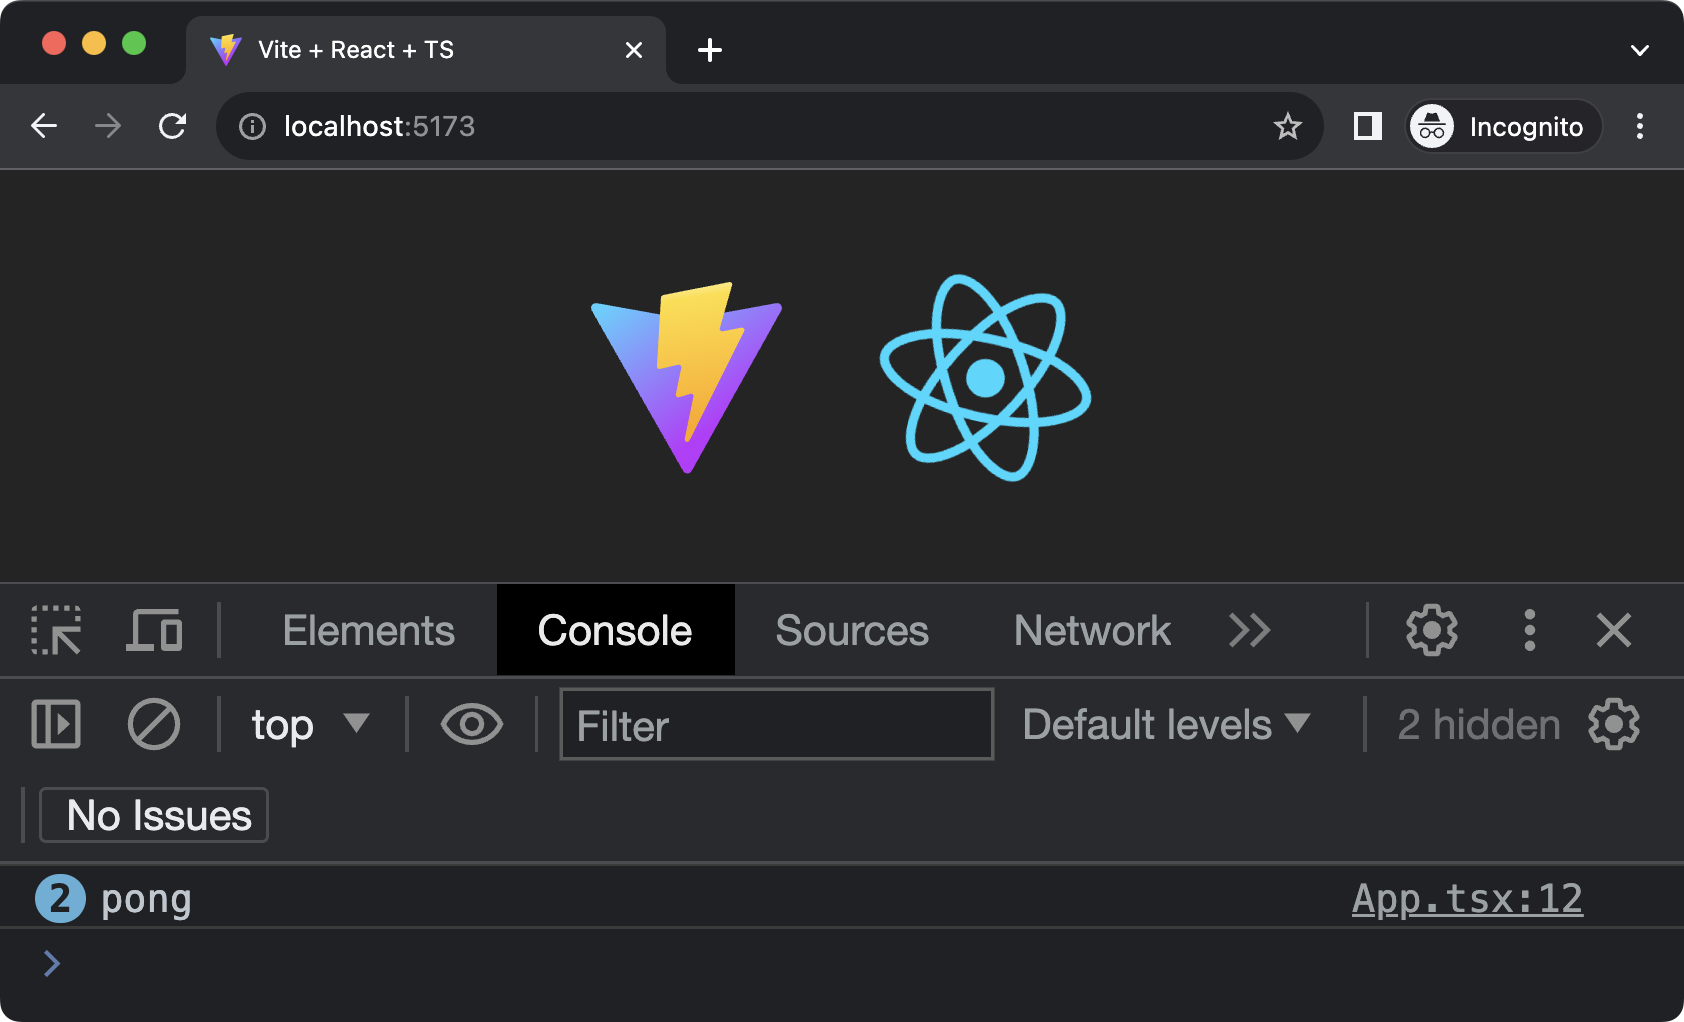
Why it's logging the string pong twice you ask?
That's a story (rant) about React for another time 🙂
Okay great.
We've managed to connect to our backend endpoint. And it looks like this:
// App.tsx

fetch('http://localhost:8080/api/ping')
  .then((response) => response.text())
  .then((body) => console.log(body));
And this works fine as long as we're developing locally.
In the bundled scenario, however, where the frontend and the backend are served together via Spring Boot, our API request should look like this:
// App.tsx

fetch('/api/ping')
  .then((response) => response.text())
  .then((body) => console.log(body));
To make this work, we'll introduce two .env files (both of which should be tracked with Git version control):
.env.development.env.production
Their contents simply contain the necessary API base URL for each environment.
# .env.development

VITE_API_BASE_URL=http://localhost:8080/api
and
# .env.production

VITE_API_BASE_URL=/api
A few notes on how Vite is setup to deal with environment variables:
- when it encounters
.envfiles containing properties prefixed withVITE_, it'll make those properties available within your frontend - to access these properties, you can use
import.meta.env.VITE_API_BASE_URL, for example - when running the application via
npm run dev, Vite will read the.env.developmentfile - when making a production build via
npm build, Vite will read the.env.productionfile instead - note that Vite also supports custom modes which are worth looking into if you've got test or staging environments, but for our purposes, development and production are all the modes we need
- please don't be confused by our chosen variable name
VITE_API_BASE_URL, since Vite also exposes aBASE_URLproperty on theimport.meta.envobject, which corresponds to the URL namespace under which the frontend is hosted (something we'll look at later in this article)
Also, for added type safety, I like adding the following Env.ts file at the root of my frontend /src folder:
// Env.ts

const { VITE_API_BASE_URL, ...otherViteConfig } = import.meta.env;

export const Env = {
  API_BASE_URL: VITE_API_BASE_URL as string,
  __vite__: otherViteConfig,
};

// This is one of the few places where I recommend adding a `console.log` statement
// To make it easy to figure out the frontend environment config at any moment
console.log(Env);
After opening the browser console at http://localhost:5173, you'll find the correct development base URL logged there:
{
  API_BASE_URL: 'http://localhost:8080/api',
  __vite__: {...}
}
Similarly, after bundling the frontend with the backend via npm run build,
and restarting the backend,
you'll find that the correct production base URL logged to the browser console at http://localhost:8080
{
  API_BASE_URL: '/api',
  __vite__: {...}
}
Now that we have our variable, we can finally generalize the backend HTTP request to support either environment 🎉.
// App.tsx

fetch(`${Env.API_BASE_URL}/ping`)
  .then((response) => response.text())
  .then((body) => console.log(body));
Basic Authentication
In this section, we'll be setting up basic authentication: a very simple and lightweight authentication protocol, with great browser support.
To get started, add the following two dependencies to your pom.xml file.
<dependency>
    <groupId>org.springframework.security</groupId>
    <artifactId>spring-security-web</artifactId>
</dependency>
<dependency>
    <groupId>org.springframework.security</groupId>
    <artifactId>spring-security-config</artifactId>
</dependency>
Next, let's open up our SpringConfiguration.java file, where we'll be registering the following 3 beans:
package com.jessym.springspa;

@Configuration
public class SpringConfiguration implements WebMvcConfigurer {

    public static final PasswordEncoder BCRYPT = new BCryptPasswordEncoder();

    @Bean
    public InMemoryUserDetailsManager inMemoryUserDetailsManager() {
        //
        // 1️⃣: First bean
        //
        UserDetails user = User.builder()
            .username("jessy")
            .password(BCRYPT.encode("abc123"))
            .build();
        return new InMemoryUserDetailsManager(user);
    }

    @Bean
    public PasswordEncoder passwordEncoder() {
        //
        // 2️⃣: Second bean
        //
        return BCRYPT;
    }

    @Bean
    @SneakyThrows
    public SecurityFilterChain securityFilterChain(HttpSecurity httpSecurity) {
        //
        // 3️⃣: Third bean
        //
        return httpSecurity
                .httpBasic(config -> {})
                .csrf(config -> config.disable())
                .authorizeHttpRequests(config -> {
                    config
                        .requestMatchers("/api/ping").permitAll()
                        .anyRequest().authenticated();
                })
                .sessionManagement(config -> {
                    config.sessionCreationPolicy(SessionCreationPolicy.STATELESS);
                })
                .build();
    }

    // Remaining methods below...
    //  - addCorsMappings
    //  - addResourceHandlers
    //  - serveDirectory

}
The first bean 1️⃣ is used for informing Spring about the usernames and passwords of the people who are allowed to log in.
We're using an InMemoryUserDetailsManager out of convenience here,
but it's also possible to use the built-in JdbcUserDetailsManager, for example,
or even your own implementation of the UserDetailsManager.
Also, when using the InMemoryUserDetailsManager in a real application:
- you'd probably want to accept the username and password as environment variables or configuration values
- you wouldn't want to hash the plaintext
abc123password on the fly when starting the application, but instead accept an already hashed password as an environment variable, and pass it as-is into thepassword(...)method without the intermediateBCRYPT.encode(...)invocation
As for the second bean 2️⃣, this one simply tells Spring which password hashing algorithm we'd like to use—a good candidate is Bcrypt.
Note that this hashing algorithm should correspond with the one that's used for generating the password hash which gets passed to the password(...) method of the UserDetails above.
The third bean 3️⃣ gets registered as a means to configure which parts of the application (i.e. which URLs) require authentication.
Let's break it down line-by-line.
// Part 1
.httpBasic(config -> {})
This is used for actually enabling basic auth within Spring. The empty lambda shows that the default configuration doesn't require any tweaking.
// Part 2
.csrf(config -> config.disable())
I tend to disable Spring's Cross-Site Request Forgery (CSRF) protection for two reasons:
- the CSRF attack is pretty much mitigated by only issuing cookies with the
SameSite=Strictattribute - Spring's default CSRF protection implementation is stateful 😬
It's stateful because Spring generates a unique session token for each user, which is tied to the in-memory session store of the particular backend instance which issued it.
Spring then requires the client to submit this session token (via a cookie) on every subsequent request, but that invariably stops working when you've got multiple backend instances running in parallel.
// Part 3
.authorizeHttpRequests(config -> {
    config
        .requestMatchers("/api/ping").permitAll()
        .anyRequest().authenticated();
})
This is the part where you get to configure which exact URLs require authentication.
Above is a very basic example which allows anyone to make an HTTP request to the /api/ping endpoint, but requires authentication on every other endpoint.
// Part 4
.sessionManagement(config -> {
    config.sessionCreationPolicy(SessionCreationPolicy.STATELESS);
})
Here, we're simply letting Spring know that we're not interested in automatically generating a session token for each user,
preventing Spring from automatically dishing out JSESSIONID cookies to anyone.
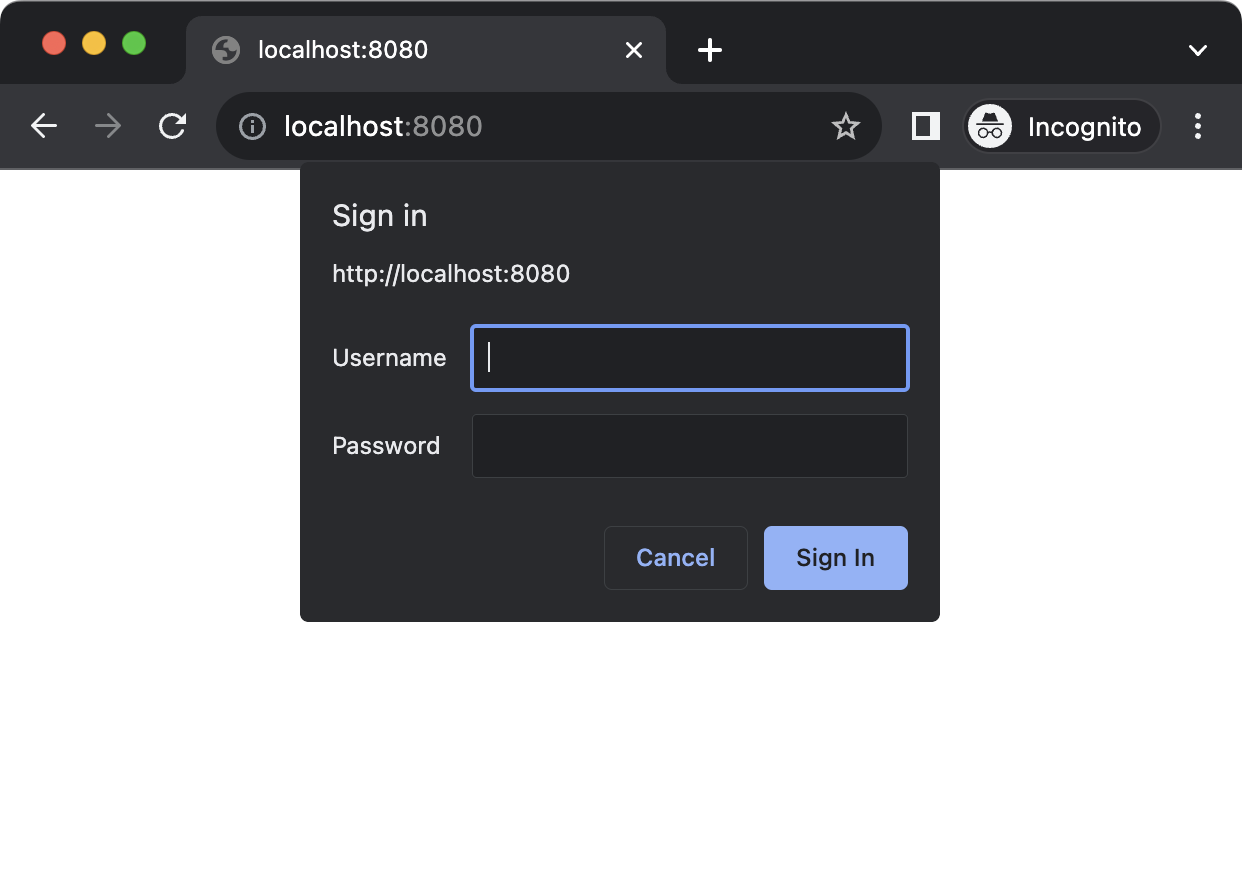
After making these changes and restarting the backend, you should find yourself having to authenticate in order to visit http://localhost:8080 or http://localhost:8080/cake
(Visiting http://localhost:8080/api/ping should still work without authentication, though.)
Basic authentication is now enabled 🔐.
Caveats when Hosting the Frontend under a Namespace
Let's assume you'll want to host your frontend under the /dashboard URL namespace, i.e.:
| URL | Screen |
|---|---|
/dashboard | Welcome page ⚛️ |
/dashboard/cake | Cake page 🍰 |
/dashboard/<anything-else> | 404 page 🤷♂️ |
This requires the following changes in our setup:
-
Renaming the folder
src/main/resources/statictosrc/main/resources/dashboard, as this prevents Spring's default behaviour of automatically serving the frontend under/as well- remember to update
vite.config.ts, so that the new output folder becomes'../resources/dashboard/' - also remember to update your
.gitignorefile to ignore this new dynamically generated source folder
- remember to update
-
Updating the
SpringConfigurationto serve the new classpath folder under the desired namespace:this.serveDirectory(registry, "/dashboard", "classpath:/dashboard/") -
Updating the frontend configuration and routing library
react-router-dom, so they both know that they're hosted under a particular namespace (more info below)
This last step (3) is necessary, because,
if the frontend doesn't know that it's being hosted under the /dashboard URL namespace,
then:
- it cannot make sense of a URL like
/dashboard/cake, resulting in a client 404 - it already fails at loading the necessary JavaScript and CSS chunks, because it doesn't know that it should prefix its request paths with
/dashboard
Here's how to apply the necessary changes for step (3) to our frontend configuration.
- Add the
base: '/dashboard'property tovite.config.ts, like so:
// vite.config.ts

export default defineConfig({
  plugins: [react()],
  base: '/dashboard',
  build: {
    outDir: '../resources/dashboard/',
    emptyOutDir: true,
  },
});- Extend the
createBrowserRouterinvocation (insidemain.tsx) with abasename: '/dashboard'property, like so:
// main.tsx

const router = createBrowserRouter(
  [ ... ],
  {
    basename: '/dashboard',
  },
);
Now that the frontend understands that it's being served under the /dashboard namespace,
it will both
- interpret routes, and
- request assets
in accordance with this namespace 🙂
CI/CD
Let's finish up with an improvement to our build setup. As well as a simple CI/CD, *ahem*, CI pipeline with GitHub actions.
Building the Frontend as Part of the Maven Lifecycle
Whenever building our application in full, i.e. backend and frontend, we need to run the following two commands (in order):
npm --prefix src/main/client run build
./mvnw clean package -DskipTests
Now, this works fine, and we might even decide to save this into a build.sh file at the root of our project.
However, we can also use the Exec Maven Plugin to automatically build the frontend as part of the Maven lifecycle.
Start by opening your pom.xml file, and scrolling down to the <build> section:
<build>
  <plugins>
    <plugin>
      <groupId>org.springframework.boot</groupId>
      <artifactId>spring-boot-maven-plugin</artifactId>
    </plugin>
  </plugins>
  <!-- the new Exec Maven plugin will be inserted here -->
</build>
Next, insert the following plugin:
<plugin>
    <groupId>org.codehaus.mojo</groupId>
    <artifactId>exec-maven-plugin</artifactId>
    <version>3.1.0</version>
    <executions>
        <execution>
            <id>install-frontend-dependencies</id>
            <phase>generate-sources</phase>
            <goals>
                <goal>exec</goal>
            </goals>
            <configuration>
                <workingDirectory>src/main/client</workingDirectory>
                <executable>npm</executable>
                <arguments>
                    <argument>install</argument>
                </arguments>
            </configuration>
        </execution>
        <execution>
            <id>build-and-include-frontend</id>
            <phase>generate-sources</phase>
            <goals>
                <goal>exec</goal>
            </goals>
            <configuration>
                <workingDirectory>src/main/client</workingDirectory>
                <executable>npm</executable>
                <arguments>
                    <argument>run</argument>
                    <argument>build</argument>
                </arguments>
            </configuration>
        </execution>
    </executions>
</plugin>
(Have a look at the pom.xml here for the final version.)
What we've done, is attach the following two custom commands to the generate-sources phase of the Maven lifecycle:
npm installnpm run build
This means that, whenever we run any of the following commands:
./mvnw compile./mvnw test./mvnw package./mvnw install
Maven will first run our two NPM commands, making sure that the correct frontend assets are generated and placed in the src/main/resources/static/ folder.
Now, to build the application in its entirety, simply:
./mvnw packageAfter which the bundled application can be started via:
java -jar target/*.jarNote: if we had any frontend tests, we could similarly attach an <execution> for npm test to the Maven test lifecycle phase.
Creating a GitHub Actions Pipeline
Below you'll find a copy of the
main.yaml
GitHub Actions workflow file I've created and placed in the .github/workflows/ folder:
on:
  push:
    branches:
      - 'main'
  pull_request:
    branches:
      - 'main'

env:
  JAVA_DISTRO: ''
  JAVA_MAJOR_VERSION: ''
  NODE_MAJOR_VERSION: ''

jobs:
  main-ci-cd:
    name: 'Main Pipeline'
    runs-on: 'ubuntu-latest'
    steps:
      - name: 'Setup :: Checkout'
        uses: 'actions/checkout@v4'

      - name: 'Setup :: Determine Java and Node versions'
        run: |
          echo "JAVA_DISTRO=$(cat .tool-versions | grep java | awk '{ print $2 }' | awk -F- '{ print $1 }')" >> $GITHUB_ENV
          echo "JAVA_MAJOR_VERSION=$(cat .tool-versions | grep java | awk '{ print $2 }' | awk -F- '{ print $2 }' | awk -F. '{ print $1 }')" >> $GITHUB_ENV
          echo "NODE_MAJOR_VERSION=$(cat .tool-versions | grep nodejs | awk '{ print $2 }' | awk -F. '{ print $1 }')" >> $GITHUB_ENV

      - name: 'Setup :: Java'
        uses: 'actions/setup-java@v3'
        with:
          distribution: ${{ env.JAVA_DISTRO }}
          java-version: ${{ env.JAVA_MAJOR_VERSION }}
          cache: 'maven'

      - name: 'Setup :: Node'
        uses: 'actions/setup-node@v3'
        with:
          node-version: ${{ env.NODE_MAJOR_VERSION }}
          cache: 'npm'
          cache-dependency-path: 'src/main/client/package-lock.json'

      - name: 'Application :: Build'
        run: ./mvnw package -DskipTests
As can be seen from the YAML file above, it performs the following steps whenever there's a push or a pull request towards the main branch:
- Perform a checkout
- Determine the Java and Node versions. Since I'm already using the asdf version manager for local development, I've got a .tool-versions at the root of my project containing the exact versions I'm using locally. With some ✨ trickery ✨, we can extract the right values from this file.
- Install Java
- Install Node
- Actually build the application
And, ideally, we'd also include a step for running tests here—if we had tests, that is 🤷♂️.
Conclusion
Combining the backend and the frontend into a single project, and packaging them together into a single Spring Boot application can be a useful method for keeping things together and reducing operational complexity.
If you've made it this far: congratulations, and thank you for reading 🙂