Internationalizing React Apps with FormatJS
We'll explore the internationalization of a React application using the powerful FormatJS library, and I'll show you some tricks to make it work well with TypeScript.

i18nreactreact-intlformat.jsfrontendInternationalization, or i18n for short (because there are 18 letters between the first i and the last n), is the process of preparing your website or app to support local languages and cultural preferences. So, whereas an English (British) visitor of your website would get to see:
The perfect temperature for a cup of tea is 71.29 degrees Celsius
A Spanish visitor would get to see:
La temperatura perfecta para una taza de té es de 71,29 grados Celsius
Mind you that internationalization is not just about translating words, though. E.g.: for Brits, it's common to use a dot as the decimal separator (71.29), whereas for Spaniards it's common to use a comma (7,29).
By using language and region-specific
- words,
- measurement units (metric system vs. imperial system),
- decimal separators, and
- writing style,
internationalization allows you to offer a local experience to visitors or users from different cultural backgrounds.
So, in this article we'll have a look at setting up internationalization in a React application,
using the powerful FormatJS react-intl library.
You should think of FormatJS as a general internationalization framework, with official bindings for a number of client-side frameworks, like the react-intl binding for the React framework.
We'll have a look at how to set up react-intl in such a way that translation files are dynamically loaded,
depending on whether your visitor actually needs them;
we'll introduce some type-safety into the project,
so it's much harder to accidentally reference non-existing translation snippets,
and we'll finish with a useful overview of the powerful FormatJS message syntax.
Table of Contents
- Create React App
- Minimal i18n Example
- Dynamically Loaded Translation Files
- Statically Typed Translation Keys
- FormatJS Syntax Overview
Create React App
You can find the full source code for this demo project on GitHub.
To follow along, please make sure to have the standard suite of frontend tooling installed (node, npm, npx and yarn).
The easiest way to set up a new React application, is via the Create React App project. To generate a Typescript-based boilerplate application, simply execute the following command.
npx create-react-app i18n-example-app --template typescriptTo keep things lean, I'll immediately get rid of the following auto-generated files which we won't be using.
README.mdsrc/App.test.tsxsrc/serviceWorker.ts(remember to also remove theserviceWorkerreferences fromsrc/index.tsx)src/setupTests.ts
Minimal i18n Example
Let's start out by including the react-intl library into our project.
yarn add react-intlNext, we need to set up an internationalization context via the IntlProvider component,
because this will allow us to use components like <FormattedMessage id="websiteGreeting" />
which react-intl will resolve to something like Welcome to my website!,
depending on the currently loaded locale and translation file.
The code snippet below is a minimal example of this,
where the App.tsx main component will simply render Welcome to my website! onto the page.
// src/App.tsx

import React from 'react';
import { FormattedMessage, IntlProvider } from 'react-intl';
import './App.css';
import { loadTranslation } from './i18n';

function App() {
  return (
    <IntlProvider locale='en' messages={{ websiteGreeting: 'Welcome to my website!' }}>
      <div className='App'>
        <header className='App-header'>
          <FormattedMessage id='websiteGreeting' />
        </header>
      </div>
    </IntlProvider>
  );
}

export default App;
In order to support an additional language,
we'll just have to make sure that we're using a different set of IntlProvider properties for Spanish visitors.
<IntlProvider locale='es' messages={{ websiteGreeting: '¡Bienvenidos a mi sitio web!' }}>
  ...
</IntlProvider>
So let's convert the functional App.tsx component into a class-based stateful one,
so we'll be able to easily switch between locales and translation objects via state variables.
// src/App.tsx

import React, { Component } from 'react';
import { FormattedMessage, IntlProvider } from 'react-intl';
import './App.css';

class App extends Component {
  state = {
    locale: 'en',
    translation: { websiteGreeting: 'Welcome to my website!' },
  };

  flushLocale = (locale: string) => {
    if (locale === 'en') {
      this.setState({
        locale,
        translation: { websiteGreeting: 'Welcome to my website!' },
      });
    }
    if (locale === 'es') {
      this.setState({
        locale,
        translation: { websiteGreeting: '¡Bienvenidos a mi sitio web!' },
      });
    }
  };

  render() {
    const { locale, translation } = this.state;
    return (
      <IntlProvider locale={locale} messages={translation}>
        <div className='App'>
          <header className='App-header'>
            <button onClick={() => this.flushLocale('en')}>English</button>
            <button onClick={() => this.flushLocale('es')}>Spanish</button>
            <FormattedMessage id='websiteGreeting' />
          </header>
        </div>
      </IntlProvider>
    );
  }
}

export default App;
There are some obvious downsides to this approach. First of all, there's some unnecessary duplication going on with the English translation object.
Second; notice how we're loading both the English and Spanish translation objects,
directly when the App.tsx component loads
(because everything's inlined in the same module).
It would be much better in terms of page load optimization if English visitors wouldn't have to load Spanish translation data at all, since these translation objects can grow pretty large for bigger applications.
So that's why, in the next section,
we'll set up this i18n directory in our project,
which will house a Promise-returning loadTranslation function,
allowing us to update our App.tsx component to this:
// src/App.tsx

import React, { Component } from 'react';
import { FormattedMessage, IntlProvider } from 'react-intl';
import './App.css';
import { loadTranslation } from './i18n';

class App extends Component {
  state = {
    locale: undefined,
    translation: undefined,
  };

  flushLocale = async (locale: string) => {
    const translation = await loadTranslation(locale);
    this.setState({ locale, translation });
  };

  componentDidMount() {
    const defaultLocale = 'en';
    this.flushLocale(defaultLocale);
  }

  render() {
    const { locale, translation } = this.state;
    if (!locale || !translation) {
      return <div>Loading...</div>;
    }
    return (
      <IntlProvider locale={locale!} messages={translation}>
        <div className='App'>
          <header className='App-header'>
            <button onClick={() => this.flushLocale('en')}>English</button>
            <button onClick={() => this.flushLocale('es')}>Spanish</button>
            <FormattedMessage id={TranslationKey.websiteGreeting} />
          </header>
        </div>
      </IntlProvider>
    );
  }
}

export default App;
Here, I've chosen to show the visitor a Loading... message until the default (English) translation object has finished loading.
I've found this approach useful for scenarios where I already have the logged-in user's preferences in-memory, as it allows me to decide whether to only load the English or the Spanish translation file.
componentDidMount() {
  const defaultLocale = user.preferences.locale;
  this.flushLocale(defaultLocale);
}
If this doesn't apply to your situation,
consider loading your default (English) translation file as an ordinary direct import at the top of App.tsx.
Dynamically Loaded Translation Files
In this section, we'll be implementing the aforementioned loadTranslation function,
which is expected to return a promise containing the English or Spanish translation object:
loadTranslation(locale: string): Promise<Record<string, string>>Being able to dynamically load translations is useful because these translation objects can grow pretty big, as the application gets larger. And we wouldn't want to force our English (British) visitors to unnecessarily load the Spanish translation object.
The implementation of loadTranslation is fairly straightforward:
// src/i18n/index.ts

export function loadTranslation(locale: string) {
  if (locale === 'en') {
    return import('./en').then((module) => module.translation);
  }
  if (locale === 'es') {
    return import('./es').then((module) => module.translation);
  }
  throw new Error('Translation not found');
}
Where the above snippet refers to the following translation files.
// src/i18n/en.ts

export const translation = {
  websiteGreeting: 'Welcome to my website!',
};
// src/i18n/es.ts
export const translation = {
websiteGreeting: '¡Bienvenidos a mi sitio web!',
};We're using dynamic imports like import('./es') to let Webpack know we want to create
splitting points
in our final JavaScript bundle.
Simply put, this means that the Spanish es.ts translation file will only be loaded
if the loadTranslation function is explicitly called with 'es' as its argument.
We can put this to the test as follows:
- Create a Webpack production build via
yarn build - Serve the production files from the
/buildfolder vianpx serve build - Visit the URL from
npx serve(usually localhost:5000) - Open up the developer tools, and inspect the JS network requests
- On the page itself, click the button which says Spanish
You should now see the browser make a request for the Spanish translation file,
which would be called something like 4.055e63d3.chunk.js.
If you click on the request, you should be able to find the string ¡Bienvenidos a mi sitio web! somewhere in this JavaScript chunk.
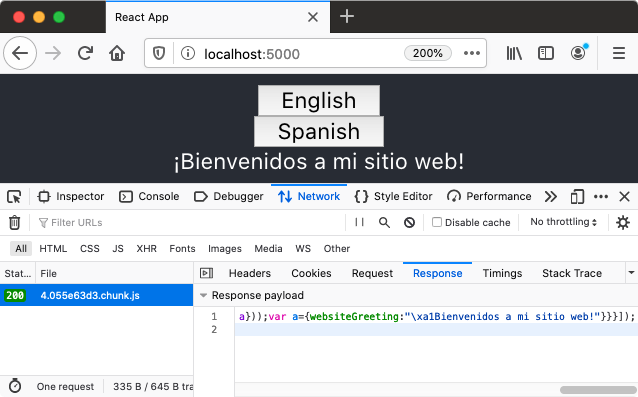
We've now successfully reached a point where Webpack no longer combines all of the translations into a single (potentially huge) JavaScript bundle, but instead loads each translation's JavaScript chunk on-demand, depending on whether it was explicitly requested for the visitor.
Statically Typed Translation Keys
With our current implementation, we're at risk for two types of errors:
- referencing a non-existing translation id from our
<FormattedMessage id="..." />components - translation files getting out-of-sync
With the help of TypeScript, we can protect ourselves against these potential problems by introducing some kind of TranslationKey enum type.
// src/i18n/TranslationKey.ts

export enum TranslationKey {
  websiteGreeting = 'websiteGreeting',
}
The next step would be to update our App.tsx file (and every other existing + future component) to only use this enum, instead of using string literals.
// src/App.tsx

import React, { Component } from 'react';
// ...
import { TranslationKey } from './i18n/TranslationKey';

class App extends Component {

  // ...

  render() {
    // ...
    return (
      {/* ... */}
        <FormattedMessage id={TranslationKey.websiteGreeting} />
      {/* ... */}
    );
  }
}

export default App;
And the final step would be to add a static type definition to both of our en.ts and es.ts translation files.
// src/i18n/en.ts

import { TranslationKey } from './TranslationKey';

export const translation: Record<TranslationKey, string> = {
  websiteGreeting: 'Welcome to my website!',
};
// src/i18n/es.ts
import { TranslationKey } from './TranslationKey';
export const translation: Record<TranslationKey, string> = {
websiteGreeting: '¡Bienvenidos a mi sitio web!',
};This should prevent the English and Spanish translations from getting out-of-sync,
since you can't just add or remove entries from either translation file,
because that would break the Record<TranslationKey, string> contract.
FormatJS Syntax Overview
Now that we've successfully set up a React application with the react-intl library,
we'll have a closer look at the FormatJS message syntax,
because there's much more to it than what we've seen so far.
FormatJS describes an abstract message syntax
which can be used for creating expressive translation templates,
but requires some extra knowledge about the FormatJS React binding
(react-intl and its various components)
to deploy in a React application.
Because we've only looked at simple substitutions of translation snippets, I will end this article with an overview of some neat FormatJS syntax features.
Argument
This formatting option is used for inserting placeholders into your translation snippets.
// src/i18n/en.ts
const translation = {
  snippet: 'Nice to meet you, {name}!',
};

// App.tsx
<IntlProvider locale='en' messages={translation}>
  <FormattedMessage id='snippet' values={{ name: 'Jessy' }} />
</IntlProvider>;

// Result
('Nice to meet you, Jessy!');
Argument (Number Type)
This one is used for formatting numerical placeholders, like numbers and percentages.
// src/i18n/en.ts
const translation = {
  snippet: `There are {bearCount, number} brown bears left in the world,
with {russiaPercentage, number, ::percent} of them living in Russia`,
};

// App.tsx
<IntlProvider locale='en' messages={translation}>
  <FormattedMessage id='snippet' values={{ bearCount: 200000, russiaPercentage: 0.6 }} />
</IntlProvider>;

// Result
('There are 200,000 brown bears left in the world, with 60% of them living in Russia');
Argument (Date Type)
This one is used for formatting date-like placeholders in a locale-specific manner.
// src/i18n/en.ts
const translation = {
  snippet: 'Opens at {openTime, date, short}, closes at {closeTime, date, medium}!',
};

// App.tsx
<IntlProvider locale='en' messages={translation}>
  <FormattedMessage id='snippet' values={{ openTime: new Date(), closeTime: 1595355295641 }} />
</IntlProvider>;

// Result
('Opens at 6/28/20, closes at Jul 21, 2020!');
Argument (Time Type)
This one is used for formatting time-like placeholders in a locale-specific manner.
// src/i18n/en.ts
const translation = {
  snippet: `Around {observationTime, time, short} I noticed that
the Monday deadline was postponed until {deadlineTime, time, medium}`,
};

// App.tsx
<IntlProvider locale='en' messages={translation}>
  <FormattedMessage
    id='snippet'
    values={{ observationTime: new Date(), deadlineTime: 1593455295641 }}
  />
</IntlProvider>;

// Result
('Around 5:22 PM I noticed that the Monday deadline was postponed until 8:28:15 PM');
Select
This control-flow formatting option can be used as some kind of switch statement inside your translation snippet.
// src/i18n/en.ts
const translation = {
  snippet: `You should have listened to
{gender, select, male {him} female {her} other {them}}...`,
};

// App.tsx
<IntlProvider locale='en' messages={translation}>
  <FormattedMessage id='snippet' values={{ gender: 'other' }} />
</IntlProvider>;

// Result
('You should have listened to them...');
Plural
This formatting option can be used for pluralization by switching on a numeric placeholder variable.
// src/i18n/en.ts
const translation = {
  snippet: `Your video had
{viewCount, plural, =0 {no views} one {one view} other {{viewCount} views}} yesterday`,
};

// App.tsx
<IntlProvider locale='en' messages={translation}>
  <FormattedMessage id='snippet' values={{ viewCount: 1 }} />
</IntlProvider>;

// Result
('Your video had one view yesterday');
Rich Text Formatting
FormatJS supports rich text formatting by allowing you to specify custom XML tags in your translation snippets, and then resolving these tags against your own resolver functions.
// src/i18n/en.ts
const translation = {
  snippet: 'This is <BO>bold</BO> and this is <IT>italics</IT>',
};

// App.tsx
<IntlProvider locale='en' messages={translation}>
  <FormattedMessage
    id='snippet'
    values={{
      BO: (...chunks) => <b>{chunks}</b>,
      IT: (...chunks) => <i>{chunks}</i>,
    }}
  />
</IntlProvider>;

// Result
('This is <b>bold</b> and this is <i>italics</i>');